By Loaflo | Yield: 1 loaf (~800g)
A rustic sourdough loaf made with a large proportion of whole wheat flour. It features a medium-high hydration (~75%) to accommodate the whole grains, an autolyse for improved gluten, and uses a baking stone with steam. Difficulty: Medium. Unique characteristics: rich, wheaty flavor, a hearty crust, and a somewhat denser, wholesome crumb full of whole grain goodness.
Ingredients
- 300g Whole wheat flour (Stone-ground if available for maximum flavor (60% of total flour weight).)
- 200g Bread flour (Provides extra gluten to help lift the loaf (40% of total flour).)
- 375g Water (Lukewarm. A higher amount is needed since whole wheat absorbs more water (75% hydration).)
- 100g Active sourdough starter (100% hydration, ripe (roughly 20% of total flour weight). If possible, fed with some whole wheat flour for more vigor.)
- 10g Salt (Fine sea salt or table salt (2% of flour weight).)
Steps
Autolyse (Flour Soak)
- In a large mixing bowl, combine the 300g whole wheat flour, 200g bread flour, and 375g water. Mix until all the flour is hydrated and you have a shaggy, sticky mass (no dry patches of flour should remain).
- Cover the bowl and let this mixture rest for 60 minutes. During this autolyse period, the flour will absorb water and gluten strands will begin forming on their own.
The autolyse is particularly beneficial for whole wheat dough. Whole grain flour contains bran and germ which soak up water and can inhibit gluten formation. By mixing flour and water first and resting, we allow the bran to soften and the dough to begin developing gluten without salt or starter present. This results in improved extensibility (the dough stretches easier) and helps offset the tendency of whole wheat to tear. Essentially, autolyse leads to better gluten development and a less dry texture in the final bread.
Mixing & Kneading
- After autolyse, add the 100g of active sourdough starter and the 10g of salt to the dough.
- Use your fingers to pinch and fold the dough (a method sometimes called the "pinch and fold" or "Rubaud" mixing): repeatedly pinch through the dough, then fold it over itself. Continue for a few minutes until the starter and salt are well integrated. The dough will start very sticky but should become smoother and more cohesive as you mix.
- Once incorporated, you can do a brief knead (either in the bowl or on a lightly floured surface). Use a stretch-and-fold or slap-and-fold motion for about 2-3 minutes. Whole wheat dough may not get completely smooth due to the bran, but aim for a moderate gluten development. The dough should be forming a ball and pulling away from the sides of the bowl a bit (though still tacky).
Adding the starter introduces yeast and bacteria, and salt tightens the gluten structure and regulates fermentation. The pinch-and-fold method gently distributes these throughout the dough. A short kneading phase further develops the gluten network, which is needed because whole wheat flour can cut gluten strands (the bran acts like little blades)​:contentReference[oaicite:1]{index=1}. You might not achieve a perfectly windowpaning dough, but some development is important for a better rise. Expect the dough to feel a bit sticky and grainy from the whole wheat – that’s normal.
Bulk Fermentation (Primary Ferment)
- Cover the dough and let it bulk ferment at 75-78°F (24-26°C) for approximately 3 to 4 hours. (If your room is cooler, it may take closer to 5 hours.)
- During bulk fermentation, perform 2 to 3 sets of stretch-and-folds about 30 minutes apart during the first half of the bulk: To do a stretch and fold, gently grab one edge of the dough, stretch it upward and fold it over the middle. Rotate the bowl a quarter turn and repeat until you've folded each side of the dough (4 folds = 1 set).
- After the final fold, leave the dough undisturbed for the remainder of the time. By the end of bulk fermentation, the dough should have risen by roughly 30-40% in volume. It will feel lighter, with a few air bubbles visible on top or through the sides of the container.
Whole wheat ferments faster than white flour due to extra nutrients in the bran and germ​:contentReference[oaicite:2]{index=2}, so keeping an eye on the dough is important (it can overferment if left too long). The stretch-and-folds during bulk fermentation strengthen the partially developed gluten without tearing it (important because whole wheat gluten can be more fragile). These folds also redistribute yeast and heat, ensuring a more even fermentation. By the end of bulk, the dough will be aerated but not doubled – whole wheat dough typically doesn’t expand as much as white dough during the first rise.
Shaping the Loaf
- Lightly flour your work surface. Gently turn the dough out of the bowl, trying not to knock out too much air.
- Preshape the dough into a round: with floured hands, fold the edges of the dough into the center from all sides (like gathering it into a pouch). Then flip it over so the folds are on the bottom, and let it rest seam-side down on the bench for about 15 minutes, covered with a towel. This rest allows the dough to relax and makes final shaping easier.
- For the final shape, prepare a proofing basket or bowl lined with a floured cloth (use a mix of whole wheat and rice flour to prevent sticking, if available).
- To shape (assuming a round loaf), flip the pre-shaped dough seam-side up. Gently flatten it a little into a circle. Fold the top 1/3 of the dough down to the center, then fold the bottom 1/3 up over it (like folding a letter). Now fold in the left and right sides to the center, overlapping slightly, to form a tight packet.
- Flip the packet seam-side down. Cup your hands around the dough and pull it towards you, rotating as you do so, to tighten it into a smooth ball. You should feel the surface tension building and the loaf holding its shape.
- Place the shaped loaf seam-side up into the prepared proofing basket (the seam will be the bottom of the loaf later). Lightly flour the top of the dough.
Shaping a high whole wheat loaf requires a gentle touch because the dough can be stickier and the bran can cause small tears if over-handled. The pre-shape and rest give the somewhat elastic dough time to loosen up, which improves final shaping. In the shaping step, folding the dough creates layers and builds tension on the surface (which is critical for a good rise and neat appearance). The goal is to create a smooth, taut skin on the outside of the loaf, while tucking the seams on what will become the bottom. Using a proofing basket supports the softer whole wheat dough during the final proof, helping it keep its form.
Final Proof
- Cover the shaped dough (in its basket) with a plastic bag or shower cap to prevent drying. You have two proofing options: a room-temperature proof or a cold retardation.
- For a room-temperature proof: Let the dough sit for about 1 to 2 hours until it expands slightly and feels airy. It won’t double, but it should show a soft spring when pressed.
- For an enhanced flavor and convenience (cold proof): Place the covered basket in the refrigerator and let the dough proof overnight for 8-12 hours. The dough will rise slowly in the cold.
- In either case, by the end of proofing, the dough should have a slight increase in volume and when gently poked, it should very slowly spring back, leaving a faint indent.
Whole wheat dough can be proofed at room temp or retarded in the fridge. An overnight cold proof (at ~37-40°F) greatly slows yeast activity, which allows more flavor to develop from bacterial fermentation without over-proofing the loaf​:contentReference[oaicite:3]{index=3}. This results in a more complex, mildly tangy flavor and can improve the bread’s digestibility. The room temp proof is faster if you plan to bake the same day, but keep a close watch because whole wheat can ferment quickly. The described poke test helps judge readiness: a slow spring back means the dough is adequately proofed and not over-proofed.
Baking (With Steam)
- If you refrigerated the dough, preheat your oven while the dough is still cold. If proofing at room temp, start preheating about 30 minutes before the dough is ready. Set the oven to 475°F (246°C). Place a baking stone or heavy baking sheet on the middle rack. Also place an empty cast iron skillet or metal pan on a lower rack (this will be used to generate steam).
- Once the oven is fully preheated, prepare to transfer the loaf. Cut a piece of parchment slightly larger than your loaf. Gently invert the proofing basket to release the dough onto the parchment; the dough should now be seam-side down. Brush off any excess flour from the top.
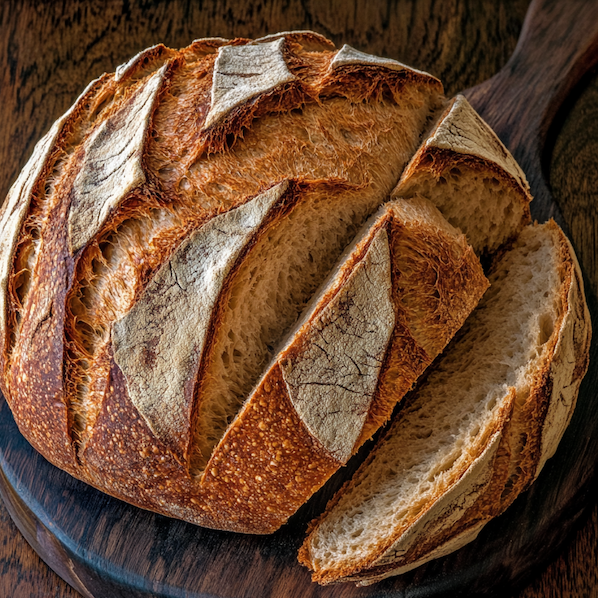
- Score the loaf with a sharp blade or lame. For a whole wheat boule, a simple pattern like a large X or a single long slash about 1/2 inch (1.25 cm) deep will work. This directs the expansion and prevents uncontrolled cracks.
- Using a pizza peel or the back of a baking sheet, slide the parchment with the scored dough onto the preheated baking stone.
- Immediately (and carefully) add steam: pour about 1 cup of boiling water into the preheated skillet/pan on the lower rack (beware of a burst of steam). Quickly close the oven door to trap the steam.
- Bake at 475°F (246°C) for 15 minutes with steam, then carefully remove the skillet with remaining water from the oven (or just let it evaporate if nearly dry). Reduce the oven temperature to 450°F (232°C) and continue baking for another 20-25 minutes.
- Bake until the crust is a deep brown (whole wheat bread tends to be darker due to extra sugars in the bran). If unsure, you can bake a few extra minutes to ensure the interior is done – the crust can take it. Remove the bread and cool on a wire rack.
Baking on a hot stone helps achieve a good oven spring and a nicely caramelized crust. Introducing steam at the beginning of the bake is crucial for any crusty bread, but especially for whole wheat which can tend to have a tighter crumb; steam delays crust formation, allowing the loaf to expand fully. Home ovens lack built-in steam injection, so pouring boiling water into a hot pan is an effective workaround​:contentReference[oaicite:4]{index=4}. The high initial heat gives the loaf maximum push, and then we lower the temperature to bake through without burning the crust. Whole wheat loaves often come out darker and more robust in crust flavor – that’s part of their hearty appeal.
Troubleshooting
- Dough is very stiff or dry during mixing: Whole wheat flour varies in absorption. If the dough felt hard to mix even after autolyse, next time increase the water by 2-3%. It should start out shaggy and soft. Also ensure you gave the autolyse enough time for the flour to hydrate.
- Dough tearing or not developing: Bran can interfere with gluten. If you saw lots of tearing during folds, try a gentler hand and possibly a longer autolyse. You could also try increasing the bread flour ratio slightly for more gluten. Another trick is to add a tablespoon of vital wheat gluten with the flour to strengthen dough (if available).
- Loaf is very dense with little rise: This could be under-proofing (the yeast didn’t produce enough gas) or the dough was too tight. Make sure your starter is very active; whole wheat can ferment vigorously, but only if the starter culture is strong. Also check that bulk fermentation went long enough – the dough should have visibly risen and shown bubbles. If it did and you still got a brick-like loaf, you might have over-proofed (less common for whole wheat, but possible). In that case, shorten the proofing time slightly next bake.
- Crumb is uneven with some areas very dense (especially bottom) and others with large holes: This may come from shaping issues or insufficient steam. Whole wheat dough is trickier to degas evenly. When shaping, press out large air pockets so you don’t get huge holes (sometimes called "mouse holes") next to dense zones. Also be sure you provided ample steam at the start of baking — without it, the crust may have hardened too soon, preventing the loaf from expanding, leading to a dense interior.