By Loaflo | Yield: 1 medium round loaf (~750g)
A rustic sourdough loaf that highlights spelt flour, an ancient grain known for its nutty flavor and extensible gluten. This recipe uses a roughly 70% spelt flour blend, moderate hydration (~70%), and gentle handling to accommodate spelt’s unique properties. Difficulty: Medium. Unique characteristics: very tender, slightly sweet crumb from spelt, with a flatter profile and open holes. Baked in a Dutch oven or cloche to help contain the spread.
Ingredients
- 350g Spelt flour (Whole grain spelt flour for authentic flavor (70% of total flour).)
- 150g Bread flour (Adds strength to the dough (30% of total flour).)
- 350g Water (Lukewarm (around 80°F/27°C). ~70% hydration. Use 10-20g less if using all white spelt (which absorbs less).)
- 100g Active sourdough starter (100% hydration, recently fed (starter fed with some spelt if possible).)
- 9g Salt (Fine sea salt (spelt dough often uses slightly less, ~1.8% of flour).)
Steps
Initial Mix and Autolyse
- In a large bowl, combine the spelt flour (350g) and bread flour (150g). Pour in about 330g of the water (reserve ~20g). Mix with your hands or a wooden spoon until all flour is hydrated and you have a shaggy, soft dough. (It will feel a bit wetter and stickier than a typical wheat dough.)
- Cover and let this dough rest (autolyse) for 20-30 minutes. This rest will allow the spelt’s gluten to begin developing gently.
- After the autolyse, add the 100g of active sourdough starter and the salt (9g) to the dough. Drizzle the reserved 20g of water on top to help disperse the salt.
- Use a pinch-and-fold motion to incorporate the starter and salt: pinch the dough repeatedly, then fold it over itself. Spelt dough is quite extensible, so it will come together quickly. Mix until the starter and salt are evenly distributed (the dough may tear a bit during mixing, but that’s okay at this stage).
Spelt flour has gluten, but it’s different from modern wheat – it’s more extensible (stretchy) and less elastic, meaning it can spread out easily. By autolysing briefly, we hydrate the spelt and let its gluten form without aggressive kneading, which helps mitigate excessive stickiness. Adding the starter and salt after autolyse ensures the gluten isn’t tightened too early by salt. The dough will be sticky and slack compared to a pure bread flour dough; that’s normal for spelt. Hydration is slightly moderated (~70%) because spelt can’t handle as much water as regular wheat without becoming too difficult to manage​:contentReference[oaicite:8]{index=8}.
Gluten Development (Gentle Kneading)
- After the ingredients are incorporated, perform a brief kneading or slap-and-fold on the dough to build strength at the outset. You can do this directly in the bowl: grab a section of dough, stretch it upward, and then slap it down onto the rest of the dough and fold over. Do this for about 1-2 minutes.
- Alternatively, you can stretch and fold the dough in the bowl for about 4-5 repetitions (every 5 minutes) within the first 20 minutes of fermentation. The dough should start to hold together in a soft mass, though it will still be very slack and will spread if left to sit.
- Once you’ve given it this initial development, cover the bowl and move into bulk fermentation.
Spelt dough benefits from some early strength-building, but it must be done carefully. A short series of slap-and-fold (a technique of quickly stretching and folding the dough) or vigorous stretch-and-fold sets can help align the gluten. However, spelt’s gluten can weaken if overworked, so we stop early. The goal is to give just enough structure that the dough can trap gas during fermentation. After this step, the dough will feel smoother but still very soft; it might not pass a full windowpane, which is okay. You'll notice spelt dough can become slack again rather quickly – that’s its extensibility at work​:contentReference[oaicite:9]{index=9}.
Bulk Fermentation
- Let the dough ferment at room temperature (~75°F/24°C) for about 2.5 to 3 hours. Spelt ferments a bit faster than regular wheat, so keep an eye on it.
- During bulk fermentation, perform 2 sets of gentle stretch-and-folds in the first hour (every 30 minutes). To do this, with wet hands, lift one side of the dough and fold it over the middle, rotate the bowl and repeat on the other sides. Use a light touch to avoid tearing the dough.
- After the first hour, let the dough rest undisturbed for the remaining time (about 1.5 to 2 hours).
- By the end of bulk, the dough will have risen maybe 30%. It will be soft, airy, and very extensible (it might spread out in the bowl). You should see some bubbles on the surface or sides. It's better to under-ferment slightly than over-ferment with spelt, because overproofing can lead to a very flat loaf.
Spelt dough ferments relatively quickly and tends to become looser as it ferments​:contentReference[oaicite:10]{index=10}. We give it a moderate bulk fermentation period, but not as long as a typical wheat dough might get. The limited number of folds helps redistribute yeast and gas without deflating the dough; too many folds can actually make spelt dough slacker by the end of bulk because the gluten can't hold up to excessive handling. We look for a modest rise, not doubling. Over-bulked spelt dough can turn to complete soup. So we stop bulk when the dough is showing aeration and a slight rise, even if it's still quite slack.
Shaping
- Prepare a proofing basket or bowl lined with a floured tea towel. (For spelt, flour it well to prevent sticking, using a mix of all-purpose and rice flour if available.)
- Lightly flour the work surface. Gently turn out the dough onto the surface; it will spread quite a bit. Handle it with floured hands and a bench scraper to prevent sticking.
- This dough will not have a lot of strength, so shaping is more about gently gathering it. First, do a pre-shape: using your bench scraper, round the dough by scooping under the edges and folding them toward the center, coaxing it into a rough circle. Dust lightly with flour and cover with a bowl or cloth, then let it rest for 10 minutes to relax.
- For the final shape (assuming a round loaf/boule): Use the bench scraper to flip the relaxed dough so the smooth side is down and the seam side is up. Gently pat it into a round. Then take the edge nearest to you and fold it up to the center. Take the edge furthest from you and fold it down to the center. Then take the left and right sides and bring them to the middle, overlapping slightly, as if folding an envelope.
- Now, slide your hands under the dough and flip it over so the seam is on the bottom. Cup your hands around the dough and gently pull it toward you in a circular motion, rotating as needed. This will tighten the loaf slightly – but be aware, spelt dough will only tighten so much and may start spreading out again quickly.
- Carefully lift the shaped dough and place it in the prepared proofing basket seam-side up. The dough will be very soft, so work quickly and confidently.
Shaping spelt is a delicate affair because the dough lacks the tenacity of typical wheat dough. It tends to spread and not hold shape well. We use flour and quick motions to prevent sticking. The pre-shape helps corral the dough into a manageable form. After a short rest, the final shaping is done gently, not over-tightening, to avoid tearing the fragile gluten network. You may notice the dough is hard to get taut – that's okay. We rely on the proofing basket and later the Dutch oven to provide support. The shape will likely relax and flatten somewhat in the basket; expect a flatter loaf than a pure bread flour sourdough. This is just the nature of spelt’s extreme extensibility​:contentReference[oaicite:11]{index=11}.
Final Proof
- Cover the basket with a plastic bag or place it in a sealed container to prevent drying. Let the dough proof at room temperature for about 1 to 1.5 hours, or until it puffs up slightly. It likely won’t double in size, but it should feel a bit more airy.
- Alternatively, you can proof the shaped loaf in the refrigerator for 6-8 hours (up to overnight) to slow fermentation and improve flavor. If doing so, let it sit at room temp for 20-30 minutes first, then refrigerate. You can bake straight from cold.
- The dough is ready when a gentle poke with a floured finger springs back slowly. Because the dough was already slack, it may be a bit harder to judge – if in doubt, err on the side of slightly under-proofed for spelt. It will continue to rise in the oven but quickly loses structure if over-proofed.
Spelt’s final proof is relatively quick since the dough is already quite fermented. We give it just enough time to become slightly more buoyant. A full room-temp proof beyond 2 hours might risk collapse because spelt’s gluten cannot support gas for too long. The poke test still works: we want a slow spring, indicating readiness. Cold-proofing is a helpful technique here; chilling the dough firms it up and can make scoring and transferring easier, plus it can enhance flavor. Many bakers prefer an overnight cold proof especially with spelt to get a bit more sourness and because shaping tension is limited.
Baking
- Place a Dutch oven (or baking cloche) in your oven and preheat it to 500°F (260°C) for at least 30 minutes. The heavy, enclosed pot will help trap steam and support the spelt loaf as it bakes.
- When ready to bake, cut a piece of parchment paper to fit over the proofing basket. Gently invert the basket to release the dough onto the parchment. Because the dough is very soft, handle the parchment by the edges to move the dough; avoid touching the dough too much.
- Lightly dust the top of the dough with flour for contrast (optional) and score it. A single long slash (at a shallow 30° angle, about 1/2 inch deep) across the loaf works well, or a simple cross. Spelt dough may spread quickly once released, so score decisively.
- Carefully remove the preheated Dutch oven from the oven. Using the parchment as a sling, lower the dough into the Dutch oven. (Be cautious of your hands near the hot pot.) Cover with the lid and return to the oven.
- Bake at 500°F (260°C) for 15 minutes with the lid on. Then reduce the oven temperature to 450°F (232°C), remove the lid, and bake for an additional 20-25 minutes, until the crust is golden brown. Because of spelt’s higher sugar content, it may brown a bit faster than a white loaf – if it’s getting too dark too quickly, you can drop the temp to 435°F (224°C) for the remainder or tent with foil.
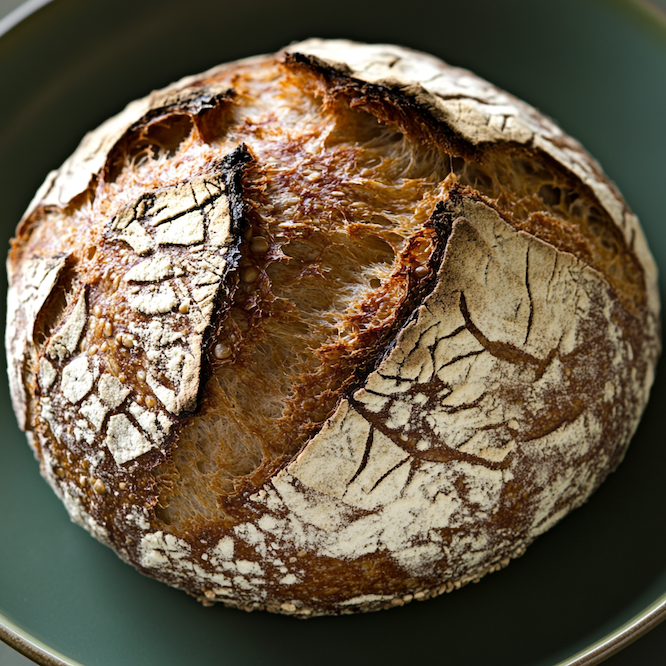
- When finished, carefully remove the loaf from the Dutch oven (using parchment to lift or tipping it out). Let it cool completely on a wire rack, at least 2 hours, before slicing. The loaf will likely be a bit flatter but with a nice open crumb.
Baking in a preheated Dutch oven provides the burst of steam needed to maximize oven spring for this spelt loaf. The high initial heat helps “set” the crust quickly and encourage whatever upward expansion the dough can manage. Spelt’s gluten doesn’t hold shape as well, so the support of the pot and steam is especially useful. Scoring gives the loaf a controlled expansion point; spelt loaves often expand more outward than upward, but a good score can still produce an ear and a decent rise. The overall bake time is slightly shorter after lid removal, as spelt tends to bake through a bit faster (and we don’t want to dry it out). Cooling is crucial to let the crumb structure stabilize – the bread will cut more cleanly once cool.
Troubleshooting
- Loaf turned out very flat, like a disc: Spelt loaves are flatter, but extreme flatness could mean the dough overproofed or was handled too roughly transferring to the oven. Next time, shorten the final proof (and/or bulk) and be very gentle when moving the dough. Baking in a smaller Dutch oven (so the loaf has less room to spread) can also help it rise taller. Also check your hydration – if you accidentally added too much water, the dough could be too slack to hold shape; reduce by 5% next time.
- Dough stuck to the proofing basket or cloth: Spelt’s low gluten can make it stickier. If it stuck badly, it likely deflated when you released it. Use ample flour or use parchment in the basket next time. Chilling the dough before turning it out can also firm up the surface and reduce sticking. If it’s minor sticking, carefully easing it out with a spatula can salvage it. Any resulting odd shape will mostly bake out in the Dutch oven.
- Crumb is very tight (small holes) and dense: This could be due to under-proofing or not enough hydration. Spelt needs sufficient water to achieve an open crumb, and its fermentation needs to be just right. If it was under-proofed, the loaf will be dense because it didn’t produce enough CO2 – give it a bit more time in final proof (but watch closely). If hydration was too low, consider raising it 2-3% (being cautious, as too high causes flatness). Also, ensure your starter was active; a sluggish fermentation will give a dense crumb.
- Crumb structure is uneven – some big tunnels but also some gummy or dense areas: This can happen if the dough wasn’t degassed at all during shaping or if shaping was uneven. Because we handle spelt dough so delicately, sometimes large gas pockets aren’t expelled and can create big holes (especially under the crust) while other parts remain tight. Next time, try a slightly firmer hand in patting out the dough during shaping to get rid of very large bubbles. Also, make sure you baked long enough; gummy areas could mean it needed a few more minutes in the oven or an extra rest before cutting. Spelt’s higher sugar can brown the crust early, tempting you to pull it out – but ensure the interior is done (200°F+ internal temp if you measure).