By Loaflo | Yield: 1 round loaf (about 850g)
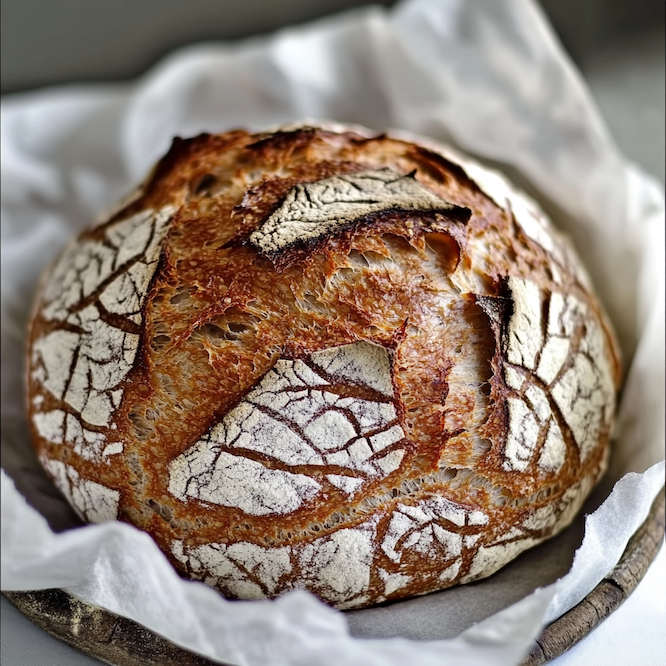
An extremely easy sourdough bread that requires no kneading or stretching – time does the work. Flour, water, salt, and starter are mixed and left to ferment overnight. Difficulty: Easy (very hands-off). Unique characteristics: higher hydration (~75%) yields an open, glossy crumb; the long fermentation develops rich flavor with minimal effort. Baked in a Dutch oven for a crackling crust.
Ingredients
- 450g Bread flour (You can use all-purpose flour if needed; bread flour gives better gluten development.)
- 50g Whole wheat flour (Adds flavor and color (optional; use 500g bread flour total if omitted).)
- 375g Water (Room temperature. This is 75% hydration (375g water for 500g flour).)
- 100g Active sourdough starter (Fed and bubbly. (If starter is 100% hydration, it contributes additional ~50g water and 50g flour.))
- 10g Salt (About 2 tsp; enhances flavor and strengthens gluten.)
Steps
Evening Mix (No Knead)
- In a large mixing bowl, combine the bread flour, whole wheat flour, and salt. Pour in the water and add the active sourdough starter.
- Use a wooden spoon or your hand to stir everything together until it forms a rough, shaggy dough with no visible dry flour. This should only take a couple of minutes of mixing – it will look craggy and sticky.
- Scrape down the sides of the bowl and cover it tightly with plastic wrap or a reusable cover. Let the dough sit at room temperature (around 70°F/21°C) overnight for 10-12 hours, undisturbed. During this long ferment, the dough will slowly rise and develop gluten without kneading.
This initial mix combines all ingredients with minimal effort. Because of the high hydration and extended fermentation, gluten will develop on its own (a process sometimes called “no-knead” development). The overnight rest at room temperature allows the wild yeast and bacteria to ferment the dough; by morning it will be bubbly and much expanded. The long fermentation time, along with the dough’s wetter consistency, builds gluten structure and flavor without traditional kneading.
Morning Shaping
- By morning, the dough should have risen significantly (perhaps doubled) and be very bubbly and jiggly. It will be much looser than a typical kneaded dough.
- Generously flour a work surface. Using a spatula or scraper, gently pour/dump the dough out of the bowl onto the floured surface. It will spread out somewhat – that’s normal for a high-hydration dough.
- With floured hands, perform a brief “fold” to shape: slide your hands under opposite sides of the dough, then lift and fold the dough in half onto itself. Rotate it and fold in half again. These two folds will start to form a loose ball and give the dough a bit of structure.
- Flour the top of the dough lightly and flip it so the seam is down. Cup your hands around the dough and gently draw it towards you, rotating a little as you do, to tighten it into a round loaf shape. You should see the surface tension increase as the loaf holds a round form (though it will still be very soft).
- Place the shaped dough seam-side down on a piece of parchment paper (this will help transfer it to the pot later), or seam-side up in a floured proofing basket if you have one.
In the morning, the dough has built significant gas and gluten simply from time. The quick folds and gentle rounding gather this very soft dough into a manageable shape without punching out all the air. Because the dough is so extensible (stretchy), handling it gently and minimally is important to avoid tearing. The shaping here is rudimentary – just enough to create a loaf shape – as the dough won’t hold a taut shape like lower-hydration doughs. Using parchment under the loaf makes it much easier to move the delicate, sticky dough into the Dutch oven.
Short Proof
- Cover the shaped dough (if it’s on parchment on the counter, cover with an inverted bowl or damp towel; if in a basket, cover the basket). Let it proof at room temperature for about 30 to 60 minutes.
- During this proof, the dough may not dramatically increase in size (maybe a 20-30% rise), but it should relax and spread slightly. You’ll notice it’s very soft and wobbly. It’s ready to bake when a gentle poke springs back slowly and a slight indent remains.
Because the bulk fermentation was so long, the final proof is kept relatively short to avoid over-fermenting. This brief rest allows the dough to continue producing carbon dioxide and for the gluten to relax a bit, making scoring easier. The dough is very hydrated and fermented, so it won’t hold a tall shape at proof – that’s expected. We rely on oven spring for the final volume.
Baking
- About 30 minutes before the end of proofing, preheat your oven to 475°F (246°C) and place a Dutch oven (with its lid) inside to preheat as well.
- When the dough is ready, score it: if it’s on parchment, you can score directly (e.g., a swift 3-4 inch long slash about 1/2 inch deep across the top). If it was proofing seam-up in a basket, gently turn it out onto parchment and then score. (If you prefer, you can skip scoring for this style of bread and let it naturally burst, but scoring yields a more controlled result.)
- Carefully remove the hot Dutch oven from the oven. Using the parchment as a sling, lower the dough into the Dutch oven. (If you proofed in parchment, just transfer parchment and dough together; if the dough was in a basket, place it on a sheet of parchment first.)
- Cover the Dutch oven with its lid and place it back into the hot oven.
- Bake covered for 20 minutes, then remove the lid. The loaf should have risen and opened up where scored. Continue baking for another 20-25 minutes uncovered at 475°F (246°C) until the crust is a deep golden brown.
- Remove the Dutch oven and carefully lift out the bread using the parchment or with tongs. Cool the loaf on a wire rack for at least 1 hour before slicing.
Preheating the Dutch oven ensures the dough hits a very hot environment, which maximizes oven spring (rapid expansion of gases) in this wet dough. Scoring allows the steam to escape in a controlled way; if not scored, this very moist dough will usually rupture at a weak point anyway. Baking with the lid on traps steam from the dough, emulating a steam-injected oven, which keeps the crust expanding. After the lid is removed, the dry heat crisps and colors the crust. The result is a bread with a chewy, open crumb and a crackling crust, achieved with almost no kneading effort.
Troubleshooting
- Dough is soupily wet and cannot hold any shape: This may happen if your room was very warm and the dough over-fermented, or if too much water was used. Next time, if overnight temps are above 75°F (24°C), shorten the ferment time or ferment in a cooler spot (or reduce the starter amount). Ensure you measure water and flour accurately. You can also fold the dough once or twice during the overnight ferment if you find it extremely loose, to build a bit more strength.
- Bread is very flat after baking with little rise: No-knead loaves rely on proper fermentation and high heat. A flat result could mean the dough over-proofed (exhausting the yeast) or was handled too roughly, deflating the gases. Make sure to not let the dough go much past double during the overnight rise. Also, be very gentle when shaping and transferring to avoid knocking out all the bubbles. Finally, check that your oven and pot were fully preheated – insufficient heat can reduce oven spring.
- Crumb is too moist or gummy: This bread tends to have a slightly custardy crumb due to high hydration, but if it’s outright gummy or dense, it may be under-baked or over-hydrated. Bake a bit longer next time (you can drop the oven to 450°F for an extra 5-10 minutes if the crust is dark but the inside needs more time). Ensure the loaf cools completely; cutting while even mildly warm will make the interior seem wet. Also check your measurements – an extra 5-10% water can make a big difference in crumb texture.