By Loaflo | Yield: 3 baguettes (~300g each)
Classic thin and long French-style sourdough baguettes made with bread flour and a touch of whole wheat for flavor. Hydration is moderate (~70%) to allow easier handling and tight shaping. Fermentation includes an overnight cold retard for flavor. Difficulty: Hard (shaping and scoring require practice). Unique characteristics: crisp, crackly crust, open irregular crumb, and a rich wheaty aroma. Baked on a stone with steam to achieve a bakery-quality crust.
Ingredients
- 450g Bread flour (Strong flour for gluten development (use unbleached bread flour).)
- 50g Whole wheat flour (About 10% of flour, for flavor (can substitute bread flour for a pure white baguette).)
- 350g Water (Room temp. ~70% hydration, a good balance for openness and handling.)
- 100g Active sourdough starter (100% hydration, ripe. (Preferably fed with some whole wheat or rye for extra fermentation power.))
- 10g Salt (2% of flour for flavor and dough strength.)
Steps
Mixing and Autolyse
- In a large bowl, mix the bread flour (450g) and whole wheat flour (50g) with about 330g of the water (reserve ~20g). Stir until a shaggy dough forms and no dry flour remains.
- Cover and let this dough autolyse (rest) for 30-45 minutes. This helps ease gluten formation for better shaping later.
- After autolyse, add the 100g of active sourdough starter and the salt (10g) to the dough. Pour in the remaining 20g water.
- Use your fingers to pinch and fold the dough, integrating the starter and salt thoroughly. The dough will initially break apart but will re-form as you mix. Squeeze the dough between your fingers and then fold it over itself repeatedly for a few minutes until mostly homogeneous.
- At this point, the dough should be sticky but cohesive. Perform a short knead on a lightly floured surface or continue folds in the bowl for another 2-3 minutes. It should start to become smooth and elastic, though still somewhat tacky. Avoid adding much flour; a little stickiness is fine.
- Form the dough into a rough ball and place it back in the bowl. Cover and proceed to bulk fermentation.
The autolyse (with just flour and most of the water) allows enzymes to begin gluten development and hydrate the flour. This makes the dough easier to handle and results in better volume and openness. Adding starter and salt after gives you more control. A moderate hydration of 70% yields a dough that is soft and a bit sticky, but manageable for shaping into baguettes, which require some dough strength. The mixing method here ensures even distribution of salt and starter. We don't need to fully develop the dough with kneading; some gluten will develop during bulk fermentation with folds. By the end of mixing, the dough should form a slightly sticky ball that can hold some shape.
Bulk Fermentation
- Cover the bowl and let the dough bulk ferment for about 3 to 4 hours at 75°F (24°C). It will expand moderately, but not double, during this time.
- During bulk, perform 3 to 4 sets of stretch-and-folds, especially in the first 2 hours. Ideally, do one every 30 minutes for the first 2 hours: with damp hands, grab one side of the dough, stretch it up and fold it over to the opposite side. Rotate the bowl and do this on all sides (that's one set). This will strengthen the gluten.
- After the last fold, let the dough rest undisturbed for the remaining time. By the end of bulk, the dough should feel aerated, smoother and more elastic, and have risen maybe 30-40%. You should see some small bubbles on top or beneath the dough.
- If your room is cooler, bulk may take longer; go by the dough's appearance rather than strictly time.
Bulk fermentation is where the dough develops flavor and some gas. The stretch-and-folds build structure without intensive kneading, which is important for baguettes to hold their shape when elongated​:contentReference[oaicite:18]{index=18}. By strengthening the gluten network during bulk, you set the stage for easier shaping and a baguette that can expand without flattening. The whole wheat accelerates fermentation slightly, so keep an eye on the volume. We don't need it to double like a pan loaf; around one-third growth with a good bubbly structure is sufficient since we'll also do an overnight cold proof for flavor and more fermentation.
Divide and Preshape
- Lightly flour your work surface. Gently turn the fermented dough out onto the counter, trying not to knock out too much air.
- Using a bench scraper, divide the dough into 3 equal pieces, each about 300g (for standard ~14-16 inch baguettes). If you prefer shorter baguettes and have smaller baking capacity, you could do 4 pieces of ~225g each.
- With each piece, preshape into a loose round or log: For a round, fold the edges of the dough into the center and flip seam-side down. For a log, gently pat the piece into a rectangle and roll it up like a jelly roll (about 6 inches long). The preshapes don't need to be tight, just gathered.
- Place the preshaped pieces seam-side down on the counter. Cover them with a damp towel or plastic wrap and let rest for about 20-30 minutes. This bench rest allows the gluten to relax for easier final shaping.
Dividing ensures equal size baguettes for even baking. The preshape step organizes the dough pieces into a preliminary shape that's easier to work with. A gentle preshape (either round or short log) builds a bit of strength while not fully committing to the final shape. The bench rest gives time for the dough's elasticity to ease off (gluten relaxes), which is critical because shaping baguettes requires stretching the dough out. If you skip the rest, the dough may be too springy and resist elongation. Covering is important to prevent a skin from forming, which would impede shaping and merging of seams.
Final Shaping (Baguette)
- Prepare a baker’s couche or a lint-free kitchen towel heavily dusted with flour (and/or semolina) to hold the shaped baguettes. This will support the loaves' shape while they proof.
- Take one preshaped piece at a time (keep others covered). If preshaped as a round, flip it seam-side up and gently flatten into a rectangle. If already a log, place it seam-side up and gently degas with fingertips to a uniform thickness.
- Fold the top third of the dough (lengthwise) down to the center and press to seal. Then fold the bottom third up to the center and seal, essentially folding the dough in thirds lengthwise.
- You now have a long narrow piece. Turn it 180° so the seam is now centered on top. Use the heel of your hand or thumb to press a trough along that central seam, reinforcing it.
- Starting from the center of the log, fold the dough in half lengthwise by bringing the long edges together, and use the heel of your hand to seal the seam tightly all along the length. Now the dough is essentially a long cylinder with the seam on bottom.
- With seam side down, begin rolling it into a baguette shape: place both hands gently on the center of the log and roll back and forth, gradually moving your hands outward towards the ends with each roll. Apply light even pressure to elongate the cylinder. The goal is about 14-16 inches length for a classic baguette (shorter if you divided into 4 pieces). The ends can be tapered by applying slightly more pressure there or by rolling them to a point.
- Transfer the shaped baguette to the prepared couche or floured towel seam-side up (since we'll flip before baking). Lift the fabric on either side of the loaf to make a fold that cradles the baguette and helps it keep shape. Continue shaping the remaining pieces similarly, placing each in the couche with folds of fabric between them.
- If any dough feels very elastic and resists shaping, let it rest a few more minutes before the final roll-out to length.
Shaping a baguette is intricate: we first form a tight cylinder with multiple folding steps to build tension and structure. The final rolling elongates the loaf to its characteristic length and thin diameter. The shaping technique described creates many layers that, when combined with surface tension, give a taut skin for a good oven spring and controlled expansion. Placing the shaped dough seam-up in the couche allows natural seam opening during proof (an old-school method to sometimes forgo scoring, but we will score anyway). The couche’s floured folds are critical – they provide support, so the baguettes proof upwards, not flattening out. Each step (folding in thirds, sealing, rolling) ensures the gluten is aligned and the loaf will have an even shape and crumb.
Proofing (Final Fermentation)
- Cover the shaped baguettes in the couche with a clean cloth or plastic wrap to prevent drying. Proof at room temperature for about 45 minutes to 1 hour, or until they have visibly puffed up.
- They should not double in size (that would risk over-proofing for baguettes), but they will appear a bit fuller and if gently poked, the dough will spring back slowly, leaving a slight indentation.
- While the baguettes are proofing, prepare the oven: place a baking stone or steel on the middle rack and preheat the oven to 480°F (249°C). Also place a cast iron skillet or heavy pan on a lower rack (for steam generation). Preheat for at least 30-45 minutes so the stone is thoroughly hot.
- Prepare for steam by having boiling water or ice cubes ready at bake time.
- If you opted to retard (refrigerate) the shaped baguettes instead of proofing immediately, you would cover them well and place in fridge at this point (after ~20-30 min at room temp). On baking day, let them sit out 30 minutes while oven preheats, then bake. (Retarding is optional for flavor scheduling; many bakers do an overnight cold proof for sourdough baguettes.)
Baguettes have a relatively short final proof, especially with sourdough. We want them a bit under-proofed going into the oven to maximize oven spring and avoid flat baguettes. Roughly 50-60 minutes at room temp is often enough (depending on temperature and dough strength). The poke test helps gauge readiness. Preheating the oven with a stone and steam pan ensures we can replicate a burst of steam (since professional ovens have steam injectors). The high temperature is crucial for getting that thin crisp crust and good color in the short bake time. If you plan to refrigerate (retard) the shaped dough to bake later or next morning, that's fine, but ensure to account for it by slightly reducing initial proof time or fridge will slow it down anyway. Cold dough can be scored nicely but might not rise quite as vigorously as room-temp proofed dough, so many bakers proof mostly, then just chill for scoring ease and scheduling.
Baking (with Steam)
- When the oven is fully preheated and the baguettes are proofed, prepare to transfer them. Cut a piece of parchment paper the size of your baking stone surface (or use a baguette transfer peel if you have one). Gently flip each baguette from the couche onto the parchment so that they are seam-side down now. Handle carefully to not deflate – you can do this by lifting the couche fabric and inverting the loaf onto the parchment.
- If the loaves have stuck slightly to the cloth, use a gentle rolling motion to free them. Align the baguettes on the parchment with a few inches gap between them.
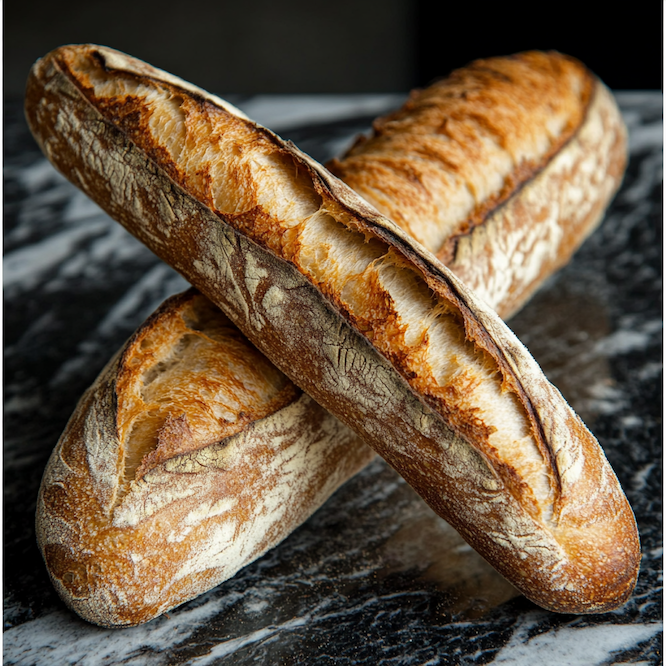
- Using a sharp lame or razor blade, score each baguette with 3 to 5 overlapping slashes along its length. Hold the blade at a shallow angle (about 30° to horizontal) and make quick, confident cuts about 1/4 inch (5-6 mm) deep. Each slash should start just before the previous one ends, down the center third of the baguette. Proper scoring allows expansion and that signature baguette look.
- Open the oven. Slide the parchment with the baguettes onto the hot baking stone (using a peel or the back of a baking sheet to shuttle it). Carefully but quickly pour about 1 cup of boiling water into the preheated skillet on the lower rack (or toss a handful of ice cubes in). Be cautious of the steam burst and immediately close the oven door to trap steam.
- Bake at 480°F (249°C) with steam for the first 15 minutes. After 15 minutes, open the oven and remove the steam pan (if water remains) or at least vent the oven briefly to let out steam. At this point, the baguettes should have risen and started to color.
- Reduce the oven temperature to 450°F (232°C). Continue baking for another 10-15 minutes until the baguettes are a deep golden brown. The crust should be crisp and blistered in spots; the cuts will have opened nicely.
- If the baguettes seem to be browning too fast, you can lower to 435°F (224°C) for the last few minutes. Conversely, if not browning, leave at higher temp a bit longer.
- Remove the finished baguettes to a wire rack. They will feel light and sound hollow when tapped. Let them cool for at least 30 minutes (you'll hear the crust crackling as they cool). Ideally, serve or eat the same day as baguettes stale quickly.
The flipping of baguettes from couche to baking surface is a critical step that can make or break their appearance. We want the seam (which was up in the couche) now down on the parchment, ready for scoring on the smooth top. Scoring baguettes is an art: the overlapping slashes at a shallow angle create an ear and a nice grigne (opened flap) along the loaf. The steam at the beginning keeps the crust soft briefly, allowing the baguettes to fully expand and achieve that open, airy crumb and nice volume​:contentReference[oaicite:19]{index=19}. Without steam, they'd burst irregularly and be denser. Baking initially at high heat ensures good oven spring and crust development; lowering the temperature after helps bake through without burning these relatively thin loaves. By the end of bake, you should have baguettes with a rich color and a loud, crackly crust. Cooling lets the interior finish setting (though baguettes, being thin, don't need as long as larger loaves).
Troubleshooting
- Baguettes turned out flat and didn't get much oven spring: This could be due to over-proofing (most common) or shaping issues. Next time, shorten the final proof; they should go into the oven a bit 'young'. Also ensure your oven and stone were fully hot and you added plenty of steam. Another factor: weak shaping (not enough tension) can cause flat baguettes. Practice tightening that outer skin during shaping. If the dough overproofed, it may have felt very limp when scoring. Aim to bake slightly earlier or use colder dough (some bakers proof baguettes in the fridge to avoid over-proofing).
- Baguettes burst or tore weirdly instead of opening along the slashes: Likely a scoring or steam issue. Make sure your slashes were done correctly (shallow angle, overlapping). If cuts are too vertical (straight down) or too deep, they can cause odd bursts. Also if not enough steam or if the crust formed too quickly (e.g., oven not steamy enough), the loaf might burst at a weak point rather than the score. Try increasing initial steam and ensure a sharp blade for clean cuts. Additionally, if the dough was under-proofed (very tight going in), it might have too much explosive force and can find its own exit points – slightly longer proof next time in that case.
- Crust is too pale or too soft: Pale crust means it likely needed more baking time or a higher temperature. Every oven is different; you might try 500°F start and 460°F finish. Also verify your oven thermostat. If crust is soft, it could be due to insufficient bake time or not venting steam – after that initial phase, letting the steam out is important to crisp the crust. Another trick: you can prop the oven door open slightly with a wooden spoon for the last 5 minutes of baking to let moisture escape. If baguettes are baked fully, they should be nicely golden and crisp. If you prefer them darker (as many French do), leave them until a few spots are a little charred. For softness, some prefer a less crisp crust – that's more a style choice (you can wrap hot baguettes in a towel to soften crust, but that goes against the traditional crispy ideal).
- Interior crumb is tight and not open (few air holes): This could be from under-proofing or under-hydration or over-handling. 70% hydration should give some openness, but baguette crumb is usually a mix of small and some medium holes, not as crazy open as a super high hydration loaf. If it's very tight, perhaps the dough needed to ferment a bit more (bulk or proof) to create more gas. Also, be gentle when shaping – if you degas completely, you'll get a tight crumb. A slight under-hydration (flour absorbing more water than expected) could also do it; maybe add an extra 10g water next time if dough felt stiff. Lastly, using all bread flour yields smaller holes than including some softer flour (like all-purpose) – you had 10% whole wheat which usually helps openness, so probably it's technique/fermentation. Try adjusting proofing times and see if crumb improves.
- Baguettes are uneven in shape or size: This comes down to dividing and shaping consistency. Weigh your dough pieces to equalize. When rolling out, apply equal pressure and time to each one. If ends are skinny and middle fat, focus more on rolling the middle next time, or ease up pressure at ends. If one is lopsided (one side thicker), you might have rolled at an angle – try to apply even pressure with both hands. It takes practice. Using a template or marking your work surface with approximate length can help ensure all baguettes are same length. Remember, minor differences won't affect taste – just strive for improvement each bake.