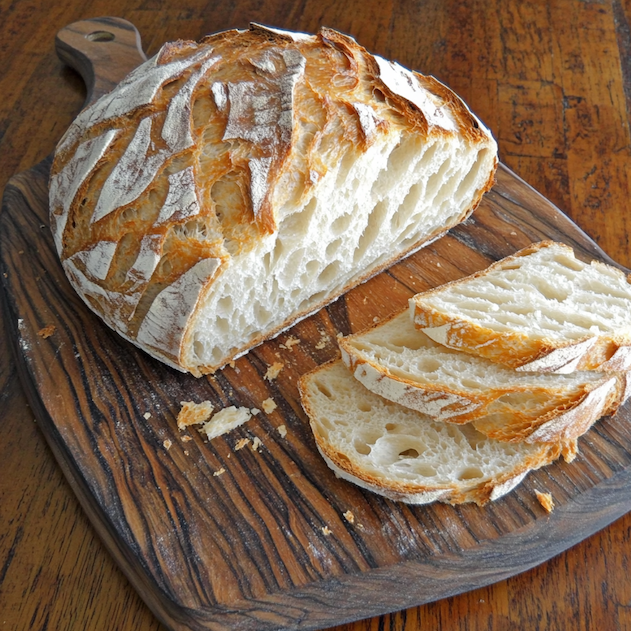
By Loaflo | Yield: 1 loaf (approximately 900g)
A step-by-step recipe for a basic sourdough bread designed with beginners in mind. It uses just flour, water, salt, and a sourdough starter to produce a crusty, flavorful loaf. This recipe guides you through each stage (mixing, fermentation, shaping, and baking) with tips to help you succeed. Total time is about 24 hours (including an overnight rest), with roughly 15-20 minutes of active work.
Ingredients
- 500g Bread flour (unbleached; or use all-purpose flour if needed)
- 350g Water (lukewarm (about 27°C/80°F))
- 10g Salt (fine sea salt or table salt)
- 100g Active sourdough starter (100% hydration; fed ~6-8 hours before use)
Steps
Mixing and Autolyse
- In a large bowl, mix 500g flour and 350g water until just combined (no dry bits of flour). Cover and let this mixture rest for 1 hour (this rest is called an autolyse).
- After 1 hour, add 100g active sourdough starter and 10g salt to the dough. Pinch and squeeze the dough with your fingers, then fold it over itself repeatedly until the starter and salt are fully incorporated and you have a rough, shaggy dough.
Autolyse (resting just flour and water) allows the flour to fully hydrate and begin developing gluten on its own​:contentReference[oaicite:0]{index=0}. This makes the dough easier to handle and improves the bread's texture. Adding the starter and salt after autolyse ensures fermentation begins once the flour is hydrated, resulting in better gluten development and easier mixing.
Bulk Fermentation (First Rise)
- Cover the bowl with plastic wrap or a damp towel and let the dough ferment (bulk rise) for about 4 to 5 hours at around 24°C (75°F). During this time, the dough will become airy and expand to roughly 1.5 times its original volume (about a 30-50% increase, not necessarily doubled)​:contentReference[oaicite:1]{index=1}.
- While the dough is rising, perform "stretch and fold" sets to develop gluten: every 30 minutes for the first 2 hours, do one set. To stretch and fold, with dampened fingers, grab one edge of the dough, gently stretch it upward, then fold it over onto the center. Rotate the bowl a quarter turn and repeat until you've folded each side of the dough (about 4 folds per set).
Bulk fermentation is when the dough undergoes its main rise. During this stage, yeast in the starter produces carbon dioxide gas and beneficial bacteria create acids, causing the dough to rise and develop flavor​:contentReference[oaicite:2]{index=2}. You should see the dough becoming smoother and bubbly, and its volume increases by about 30-50%​:contentReference[oaicite:3]{index=3}. The stretch-and-fold technique strengthens the gluten network, helping the dough trap gas and hold its shape​:contentReference[oaicite:4]{index=4}. It's important to watch the dough's volume and signs of fermentation as well as the clock, since temperature can speed up or slow down the rise.
Shaping the Dough
- Lightly flour a clean countertop. Gently turn the fermented dough out of the bowl onto the counter, trying not to deflate it too much (preserve those gas bubbles).
- If you were making multiple loaves you would divide the dough now, but this recipe makes one loaf, so no dividing is needed. Pre-shape the dough by folding the edges toward the center (imagine folding it into a ball). Then flip the dough over (so the smooth side is up) and let it rest on the counter for 20-30 minutes under a towel. This rest is called the bench rest.
- After resting, perform the final shaping. For a round loaf (boule), flip the dough smooth side down again so the seam side is up. Take the bottom edge and fold it up to the center of the dough. Take the right edge and fold it to the center, then take the left edge and fold it in, and finally fold the top edge down (like folding an envelope). Flip the dough over so the seam is now on the bottom (smooth side up). Cup your hands around the dough and gently pull it toward you, which tucks the bottom under slightly and creates tension on the surface. Rotate the dough and repeat the pulling motion a few times to tighten the loaf into a smooth, taut ball.
- Dust a proofing basket or a bowl lined with a clean kitchen towel with flour. Place the shaped dough into it seam-side up (the smooth side will be at the bottom, seams on top).
Shaping gives the dough structure and prepares it for the final rise. The goal is to create surface tension by tightening the outer 'skin' of the dough. This helps the loaf hold its shape and rise upwards rather than spread out. Proper shaping results in a taller loaf with a good oven spring and open crumb​:contentReference[oaicite:5]{index=5}. The bench rest after pre-shaping relaxes the gluten, making the final shaping easier and more effective.
Proofing (Second Rise)
- Cover the shaped dough and let it proof. At room temperature (~21-24°C or 70-75°F), this will take about 2 to 3 hours. The dough is ready to bake when it looks slightly puffed up and a gentle poke with a finger springs back slowly, leaving a slight indent.
- For an easier schedule or more flavor, you can do a cold proof in the refrigerator instead: cover the dough and refrigerate it for 8-12 hours (overnight). The dough will rise slowly in the cold. You can bake it straight from the fridge the next day (no need to warm it up; cold dough can go directly into the preheated oven).
Proofing is the final rise of the shaped dough before baking. In this stage, the yeast is still active but will slow down as it uses up nutrients. You want the loaf to rise further and develop flavor, but not to the point of collapsing. An overnight refrigerator proof (often called 'retardation' by bakers) slows fermentation and can enhance flavor and crust texture, often yielding a more blistery crust and a more pronounced sour taste​:contentReference[oaicite:6]{index=6}. It also gives you flexibility in timing, since you can bake the loaf at your convenience the next day.
Baking
- Preheat your oven to 250°C (480°F) about 30-45 minutes before baking. If you have a Dutch oven (a cast iron pot with a lid), place it in the oven to preheat as well. Starting with a very hot oven and preheated vessel will give a better oven spring.
- When the oven is hot and the dough is finished proofing, prepare to bake: Cut a piece of parchment paper big enough to hold your loaf. Gently invert your proofing basket or bowl to release the dough onto the center of the parchment (the smooth side of the dough should now be on top). Be careful not to deflate the dough as you handle it.
- Optional: Lightly dust the top of the dough with flour for a rustic look. Then, using a sharp knife or bread lame, score the top of the dough with 1-3 slashes, about 6 mm (1/4 inch) deep. This gives the loaf room to expand in the oven and helps control where it splits.
- Using oven mitts, carefully remove the preheated Dutch oven from the oven. Lift the parchment paper with the dough on it and lower it into the Dutch oven. (If you don't have a Dutch oven, leave the dough on the parchment and slide it onto a preheated baking stone or baking sheet.) Cover the Dutch oven with its lid and place it back in the hot oven.
- Bake for 20 minutes with the lid on (this traps steam and helps the bread rise). Then remove the lid, reduce the oven temperature to 230°C (450°F), and bake for another 20-25 minutes with the lid off. If you're not using a Dutch oven, also remove any water pan at this point if you used one for steam. Continue baking until the loaf is a deep golden brown.
- Using oven mitts, carefully take out the bread and place it on a cooling rack. It should feel light and sound hollow when you tap the bottom. Let it cool for at least 2 hours before slicing to allow the crumb to set.
Baking begins with high heat and steam to give the bread a strong oven spring (the quick rise in the oven before the crust hardens). The steam keeps the crust moist and flexible so the loaf can expand fully, which is why a Dutch oven or adding water for steam yields a better rise and crust​:contentReference[oaicite:7]{index=7}. Scoring is done to provide controlled expansion points for the bread. After the initial phase, lowering the temperature and removing the lid (or steam source) allows the crust to dry out and turn a rich golden color. By the end of baking, the internal temperature of the bread should reach around 96°C (205°F) to ensure the inside is cooked through.
Troubleshooting
- If your bread comes out very dense or doesn't rise much, it might be under-fermented (under-proofed) or the gluten was not developed enough. Under-proofing means the dough didn't rise long enough or the environment was too cool, so not enough gas was produced​:contentReference[oaicite:8]{index=8}. Make sure your starter is active and bubbly before baking. Next time, give your dough more time during bulk fermentation (or keep it in a slightly warmer place). Also, ensure you did the stretch-and-folds; the dough needs strength to hold the bubbles. Avoid adding too much extra flour during handling, as a stiffer dough can inhibit rise.
- If your loaf spreads out flat or collapses instead of rising tall, it was likely over-proofed (fermented too long). When dough is over-proofed, the yeast runs out of food and the gluten structure breaks down, so it can't hold its shape and will deflate easily​:contentReference[oaicite:9]{index=9}. To fix this, shorten the proofing time next bake or try proofing in a cooler environment. Keep an eye on the dough during final proof – it's better to bake a tad early than too late. Also, handle the dough gently when transferring to the oven; rough handling can knock out the gases and cause collapse.
- Bread that tastes too sour usually means the fermentation went on too long or was too warm, leading to excess acid production. Using a higher starter amount or an overly acidic starter can also cause this. To reduce sourness, shorten the bulk fermentation or proofing time, or ferment the dough in a cooler place (or do an overnight fridge proof for milder flavor)​:contentReference[oaicite:10]{index=10}. Also, ensure your starter was fed recently; a well-fed starter has a balance of yeast and bacteria. If your starter is very acidic, try feeding it more frequently before baking to mellow out the sourness​:contentReference[oaicite:11]{index=11}.
- If your sourdough loaf lacks tang or tastes bland, it may not have fermented long enough or your starter is on the mild side. You can increase the flavor by fermenting a bit longer (try extending the bulk ferment or doing the proof overnight at cooler temps for more depth)​:contentReference[oaicite:12]{index=12}. Using a bit of whole grain flour (like rye or whole wheat) in the dough or in your starter feed can also boost sour flavors. Also check that your starter is mature and active; a young or less active starter will produce less sour flavor.
- A gummy or doughy interior is often a sign of under-baking or cutting the bread too soon. Make sure you bake the loaf long enough – a fully baked sourdough often has an internal temperature around 96°C (205°F). If you don't have a thermometer, look for a deep golden-brown crust and that hollow sound when tapping the bottom. Also, always let the bread cool completely before slicing (at least 2 hours). Cutting while warm will make even a well-baked bread seem wet or gummy inside. High hydration dough or insufficient gluten development can contribute to a gummy crumb as well, so be sure to follow the recipe's ratios and techniques closely (proper folding, fermentation, etc.).
- If your crust is too pale and soft, it might not have baked long enough without steam. Make sure to remove the Dutch oven lid (or stop steaming) after the initial phase so the crust can crisp up. Baking a few minutes longer can also improve crust color. On the other hand, if the crust is very dark or hard, try slightly reducing the baking time or temperature next time. Using a Dutch oven usually gives a thin, crisp crust; if it's too thick or tough, it could be due to over-baking or a very dry oven in the final stages. You can also experiment with leaving the bread in a turned-off oven with the door cracked open for 5-10 minutes after baking, which helps dry the crust without burning. Remember, every oven is different, so you might need to adjust times or temperatures to get the perfect crust.